in

RV Under Sink Water Filter Install

Enjoy perfect drinking water with this easy under-sink add-on RV drinking water filter and faucet install.

In my search for fun upgrade projects for our Airstream, water quality improvement was an easy, top-of-the-list item. RV water quality can be a big problem. Water fill-ups from unknown sources can potentially introduce unpleasant and dangerous water into your RV.

An easy fix is to use an inline filler-hose filter systems when adding water to your RV. These work well and are relatively inexpensive, and for sure I plan to get and use one as well.

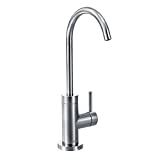
But for this project, I had something a bit more surgical in mind. I was thinking it would be great to add a dedicated filtered drinking water faucet. Something with the filter unit very near the tap, to provide a convenient source of clean water for drinking, cooking and coffee, and “double” filter the water from our fresh water tank before we drink it. A set up like this would also allow for the isolation of this filtered drinking water circuit for filter body changes and protection from antifreeze during winterization. Win, win, win.

Under sink inline drinking water filter install with separate drinking water faucet.
Install of a dedicated filtered water faucet with under sink inline filter unit for our Airstream. #Yawesome

Modern water filters are inexpensive, easy to install and function at very high levels. The 3M Filtrete Maximum under sink filter system we picked for this project removes lead, cysts, chlorine, odors and sediment particles down to 0.5 microns with in-line flow rates of 1.5 gallons per minute – impressive. What’s more impressive is it’s cost of less than $50 including the filter cartridge, making them an option for most RVers.

When researching water filtration for our Airstream, we also considered reverse osmosis filter systems, but these systems are generally not very RV friendly. They require frequent and large volume flush cycles which can quickly fill a waste water tank (and empty your fresh water tank). They are also fairly large, and require a storage tank. Newer reverse osmosis systems designed for RVs are more efficient and may work for your system.

So, to make the project a reality, I just needed to find a reasonable location to mount the under-sink water filter housing and a place on the counter top to install a drinking water faucet.

Luckily, our 23′ Globetrotter model makes the filter install a breeze with a perfect mounting spot for the filter unit and easy-to-drill Corian® countertops.

Overview | RV drinking water filter install

Project Goal: Install an under-counter RV drinking water filter and faucet in your RV
Difficulty: Beginner
Time: 2 Hours
RV drinking water filter install Cost: $200

Supplies List | RV drinking water filter install

Tools List | RV drinking water filter install

Steps | RV drinking water filter install

  1. Plan a Location for the filter unit and faucet
  2. Explore the area under the sink of your RV. Find a location were the filter unit will fit and be reasonably close to the desired faucet install location. It is possible to locate the filter unit distant from the faucet location, it will just require longer supply and return tubing runs.

    In our 23' Airstream Globetrotter, the filter fits perfectly behind the drawer stack and just to side of the sink. There is a very handy access cut into the counter (used as a counter trash cutout), making it really easy to place and mount the filter unit.

    For the filtered water faucet placement, I picked a spot near the filter unit where there was sufficient material (plywood) under the counter that provided a sound mounting substrate for the faucet washer and bolt.

  3. Install Filtered water faucet
  4. Choose a location for the new filtered water faucet and install. Check the surface under the planned installation location as there may be obstructions (sink clamps, the sink edge, etc.) that will make it difficult to soundly install the mounting hardware of the faucet.

    Drill a hole through the counter top to pass the faucet. The proper hole size should be indicated by the manufacturer of the faucet. If not given, drill a hole large enough to pass the faucet stem, but not too big to interfere with the function of any base seal or o-ring. Use care to create a hole that is plumb and perpendicular to the counter surface.

    Prepare the water connection hose for the faucet. Most filtered water faucets will connect to 1/4" or 3/8" vinyl tubing via a compression nut fitting that is connected to the faucet's threaded inlet.

    The faucet I used (Franke Pescara Cold Water Filtered Faucet DW16000) accepts 1/4" tubing, but the filter unit uses 3/8" tubing. To connect the two I connected a short 1/4" tubing piece to the faucet and connected a John Guest 1/4" to 3/8" push-to-connect union.

    Before making the tubing connections to the faucet, pass the faucet through the counter hole. Make sure the faucet base has the proper seal in place prior to mounting the faucet. Next, secure the faucet using the mounting hardware for your faucet. Many use a rubber washer, metal washer and nut. Secure the mounting hardware.

    Finally, connect the tubing attachments. If you are connecting tubing from the faucet directly to the filter unit without a union, leave plenty of extra tubing when cutting the supply tubing. Later, once the filter unit is installed you can trim the faucet supply tubing to the perfect length when connecting to the filter outlet.

  5. Install water filter unit and connect to the filtered water faucet
  6. Mount the under-sink water filter unit and connect to cold water supply plumbing.

    Turn off the RV water pump and open a faucet to release any water pressure. Locate the cold water faucet connection under the sink and disconnect the flexible supply connection to the faucet. Connect a push-to-connect tee adapter to the cold water supply plumbing and reconnect the flexible cold water faucet supply hose.

    Next, connect the 3/8" tubing connection between the filter inlet fitting and the adapter you just installed. Finally, connect the filter outlet fitting to the filtered water faucet using 3/8" tubing. If you need to release any of the push-to-connect tubing fittings, push back the collar at the fitting end to release the tubing. Make sure to make clean, 90 degree cuts for tubing connections.

  7. Turn on the water and test system for leaks
  8. Open the filtered water shutoff valve that you just installed. Restart the RV water pump. Open the filtered water faucet to test for function. Water should flow with reasonable water pressure. Turn the filtered water faucet off and carefully check for waters leaks.

    I like to check for water leaks using paper towel. First, completely dry the components installed with paper toweling. Next, using new, dry paper towel, carefully pass the paper towel over all of the surfaces of the components you installed and all of the tubing connections. Look for evidence of water on the testing paper towel. There should be none!

    If connection leaks, try re-cutting the water tubing, paying particular attention the cut ends are clean and at 90 degrees to the tubing.

amzn_assoc_placement = "adunit0"; amzn_assoc_search_bar = "true"; amzn_assoc_tracking_id = "yawesome-20"; amzn_assoc_ad_mode = "manual"; amzn_assoc_ad_type = "smart"; amzn_assoc_marketplace = "amazon"; amzn_assoc_region = "US"; amzn_assoc_title = "My Amazon Picks"; amzn_assoc_linkid = "3fcedb69169a19f7d9d93cb1bad5a62c"; amzn_assoc_asins = "B00N4N9X7Q,B01C8G4F7M,B01L0ADH3K,B00IJHIHLK";

Leave a Reply

Your email address will not be published. Required fields are marked *

    Install a brake controller in a mercedes suv.

    Brake Controller Install Mercedes SUV

    Weboost RV cellular signal booster for RV camping to improve phone, text and internet service.

    Weboost RV Cellular Booster