in

MOEN RV (Airstream) Shower Faucet Cartridge Replacement

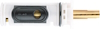
Replace the Moen 1222 shower faucet cartridge of your RV shower.

Apparently my RV shower wasn’t well winterized. The shower doesn’t shut off completely and the shower head body is cracked and leaking water.

I’m assuming there was some residual water left in the shower after I blew out the system, causing damage to the shower faucet mixer cartridge. Here is how to replace it.

Replace Airstream Moen shower faucet cartridge.
Replace Airstream Moen shower faucet cartridge (Moen 1222).

Many RVs (including our 23′ Airstream Globetrotter) use single handle Moen shower mixers. For nearly all of these Moen faucets after 2009, the Moen 1222 is the replacement cartridge.

Obviously the safe move is to remove the cartridge first, before ordering a new one to be sure you have the correct replacement.

Also interesting is that Moen products have a lifetime warranty and you should be able to get a free replacement faucet cartridge directly from Moen. I didn’t go this route, but if you have the time and patience you may be able to get your replacement free.

Overview | Replace Shower Cartridge

Project Goal: Replace the shower faucet cartridge in an Airstream RV.
Difficulty: Beginner
Time: 30 Minutes
Replace Shower Cartridge Cost: $50

Steps | Replace Shower Cartridge

  1. Order the correct faucet replacement cartridge.
  2. Identify and order the correct replacement cartridge for your faucet. Most of the single handle Moen shower faucets after 2009 use the Moen 1222 cartridge. If you are unsure, remove the old one prior to purchasing a replacement. Of interest, Moen products have a life-time warranty and you may be able to get a free replacement.

  3. Turn off water to the faucet and gather tools.
  4. Turn off and drain the water in the shower circuit before opening the mixer valve. If you have a hand wand style shower head, lower the shower head below the shower mixing valve to drain retained water.

    Gather a few tools to complete the cartridge replacement including; adjustable wrench, Allen wrench set (standard), and a Philips screw driver.

  5. Remove the existing faucet cartridge.
  6. Remove the faucet cartridge by removing the handle and attached components. Start by removing the handle by removing the 7/64" Allen head machine screw located on the underside of the handle. Rotate the handle 180 degrees to remove the screw from the top. Next use a Philips screwdriver to loosen the mounting screw holding the handle adaptor and remove the black plastic adaptor.

    Then, remove the white plastic key stop and temperature stop and the metal stop tube. Use a needle nose pliers, regular screwdriver or adjustable wrench to pull up on and remove the metal retaining clip that holds the cartridge in the faucet.

    Finally, turn the brass stem to the "on" position with the notched, flat side of the brass stem facing upward. Remove the cartridge by pulling outward on the cartridge stem using an adjustable wrench or specialized faucet cartridge pulling tool.

  7. Insert new replacement faucet cartridge.
  8. After removing the old cartridge, examine the cartridge channel for debris and clean as needed.

    Prep the new cartridge by applying silicone grease to the rubber surfaces of the new cartridge prior to installing. Then, install the lubricated cartridge into the faucet body channel until it seats. Replace the retaining clip. The retaining clip can be difficult to install and may benefit from the use of a small screw driver or similar to help guide the leading ends of the clip through the clip notch in the cartridge and the notches for the clip ends.

    Replace the stop sleeve, temp stop and key stop, handle adaptor and screw with stainless steel Philips head screw. Replace the handle and secure with the Allen head machine screw.