in

AC Coil Cleaning: How to easily do it yourself

Clean AC condenser coils improve performance and save money

How to clean the coils of an air conditioner yourself with a brush, shop vac and garden hose.

It’s easy to forget how much work your central air conditioner does everyday, and few appliances in your home run more than your AC. Yet, despite the heavy workload asked of your AC, few of us keep up with the necessary maintenance of our AC systems.

One important and easy-to-DIY maintenance item is cleaning your AC’s outdoor condenser coil. This post walks through the simple process of cleaning the coils of your AC. All you need for this projecte is a bench brush, a shop vac with a brush attachment, some dishwashing detergent and a garden hose.

AC coil cleaning - how to do it yourself with simple tools and a garden hose.
Cleaning your AC condenser coils is easy and requires only a soft brush, shop vac, dishwashing soap and a garden hose.

Keeping the condenser coil of your central AC unit clean is super important.

The condenser coil unit of your AC is the box that sits outside and receives the warmed refrigerant from the inside part of your AC (evaporator coil) after it cools the air within your HVAC system.

The job of the condenser is to compress the refrigerant from its warmed gas state back into a cool liquid and release heat from the refrigerant into the environment.

This heat release (transfer) occurs in the condenser coils which act like a radiator, releasing heat into the air passed through the coils by the condenser fan. The process depends on a large volume of airflow across the condenser coils and therefore clean, unobstructed condenser coils.

To keep your AC functioning efficiently, quietly and at the lowest cost, the condenser coils need to be cleaned periodically. Most manufacturers recommend condenser coil cleaning at least annually.

As you’ll see shortly, my condenser coils are way overdue for cleaning. Several large cottonwood trees near our home release their seed fiber each spring, quickly creating a solid layer over the surface of our condenser coils.

The good news is that  AC condenser coil cleaning is easy and only requires a few simple tools. Here are a few do’s and don’ts for cleaning your AC condenser coil.

AC Condenser Coil Cleaning Do’s:

  • Always turn off the power to the AC condenser unit before cleaning!
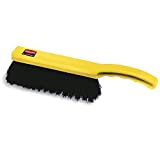
  • Do use a soft bench brush to remove heavy debris.
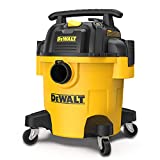
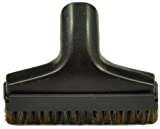
  • Do use a shop vacuum with a soft brush attachment to remove fine dust between the coil fins.
  • Do use a light mist from a garden hose to wash and rinse the condenser coils.
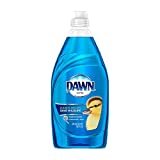
  • Do use a mild detergent like dish soap and a bench brush to degrease and wash the coils and fins.
  • Do use care when re-assembling the condenser grills to avoid pressing on and flattening the coil fins.

AC Condenser Coil Cleaning Don’ts:

  • Don’t service or clean your AC with the power on!
  • Don’t use high pressure water or a power washer to clean condenser coils – the high pressure. water can easily bend and flatten the delicate coil fins of the condenser.
  • Don’t use stiff brushes or tools that can damage and flatten condenser coil fins.
  • Don’t use flammable solvents, cleaners or fuels to clean condenser coils.

Supplies List | AC Condenser Coil Cleaning

Tools List | AC Condenser Coil Cleaning

Steps | AC Condenser Coil Cleaning

  1. Gather Tools and Supplies.
  2. Gather shop vac, brush attachment, cordless driver/drill, bit set (many use a 5/16" nut driver bit), bench brush, bucket, dish soap, garden hose and sprayer attachment. Turn the power off to the AC condenser, either at the outside breaker or at the panel in the house.

  3. Remove Condenser Grills.
  4. Using your tool of choice, remove the screws holding the side grills of the condenser, then remove the grills using care not to damage the thin coil fins of the condenser coil. Use the bench brush to clean the grills and set them aside.

  5. Brush any heavy debris off of exterior to the condenser coil.
  6. Using a soft bristle bench brush, gently brush the surface of the condenser coil clean. Brush in the direction of the coil fins - usually up and down.

  7. Vacuum the surface of the coils with a brush attachment.
  8. Using a shop vacuum with a soft brush attachment, carefully vacuum the entire condenser coil surface. Move the brush in the direction of the coil fins (usually up and down).

  9. Rinse, wash and then rinse the condenser coils with a garden hose and dish soap.
  10. Use a garden hose with a gentle spray attachment to rinse the condenser coils, starting from the top and working to the bottom. Then, using a soft, synthetic bristle bench brush or similar, apply soapy water to the surface of the coils working top to bottom. Finally, using the garden hose adjusted to a soft spray, rinse the coils from top to bottom until the soap has cleared from the coils.

  11. Reassemble the grills, restore power to the condenser.
  12. After the cleaning process is complete, reassemble the grill covers on the condenser. The grills fit together and often overlap at the seams. My Bryant unit uses tabs on the bottom of the grills that lock onto the bottom edge of the condenser frame. Once the grill panels are assembled, install the sheet metal screws. After reassembly, turn on power to the condenser unit.

    Repeat the cleaning process at least every year and possibly more frequently if you have heavy contaminants in your environment. Schedule the cleaning after tree and grass blooms and before peak cooling season for your location.

Leave a Reply

Your email address will not be published. Required fields are marked *

    EasyStart AC RV install

    Micro-Air EasyStart 364 Install Dometic Penguin II

    Airstream Dometic Penguin II air conditioner system improvements including low resistance ducts and improved airflow intake for better and quieter performance.

    Airstream Air Conditioner Tweaks to Improve Cooling Performance and Reduce Noise