in

RV / Airstream Subwoofer Upgrade

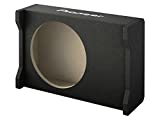
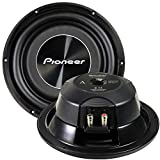
Add some bottom end to the factory sound system with an easy subwoofer install or upgrade.

I just upgraded the factory speakers in my Airstream travel trailer RV, and naturally, a new subwoofer only makes sense. Our 2020 Airstream 23′ Globetrotter does come with a respectable factory sub woofer, a sized-down custom version of the JL Audio 8″ microsub, but we can do better.

Airstream RV sound system subwoofer upgrade.
Subwoofer upgrade for our Airstream RV travel trailer.

The factor sub install has a few problems. One, they mount the sub in this Airstream model in a storage compartment under the dinette. This compartment is “sealed” and the sub has no airspace connection with the interior of the RV. In theory this is probably OK, but a vented space would likely provide better fidelity and the cabinet with the sub has an unsecured fiberboard access panel under the dinette cushion that vibrates when the subwoofer is active.

So, my goals for the new subwoofer system include; adding a port to the cabinet, securing the vibrating access panel and upgrading the sub-woofer assembly itself.

Overview | Airstream Subwoofer Upgrade

Project Goal: Upgrade and install a subwoofer in the dinette of an RV.
Difficulty: Beginner
Time: 4 Hours
Airstream Subwoofer Upgrade Cost: $200 - 500+

Supplies List | Airstream Subwoofer Upgrade

Tools List | Airstream Subwoofer Upgrade

Steps | Airstream Subwoofer Upgrade

  1. Remove the Existing Subwoofer
  2. Locate the old subwoofer - in a storage cabinet, under the dinette in our 23' Airstream Globetrotter - and remove. Prior to removing the subwoofer, you will need to disconnect the wiring harness attached to the subwoofer. Then loosen the mounting screws connecting the plastic mounting bracket connecting the subwoofer and RV floor.

  3. Remove subwoofer amp/electronics block and mount in new subwoofer cabinet
  4. The factory airstream subwoofer is an active sub - meaning it has its own amplifier and crossover electronics. The subwoofer just needs a power supply (12v) and an audio signal (RCA cable). When adding a new subwoofer to the Airstream, we have several options. We can use a new active subwoofer and just connect to the new sub to the existing 12v power supply (may need to modify the power connection) and RCA plugs. Although this is a good option, I decided to reuse the JL audio electronics/amp that was built into the factory sub. It is easily removed and mounted in the new sub cabinet.

    Because the new sub cabinet does not have a cut-out to mount the JL audio amp block, I will need to cut out a proper sized access in the new subwoofer box. To do so, I traced the old opening on to the new sub box in a location that would not interfere with the speaker mounting and remounted it using the same mounting screws.

  5. Mount the new subwoofer in the trailer
  6. After the new subwoofer is assembled, move it to the RV cabin and install. Prior to installing the new subwoofer, if you can, attach the power and speaker connections to test for proper function prior to mounting. The new Pioneer 10" shallow automotive subwoofer box fits perfectly in the same dinette bench cabinet that the old subwoofer was removed from. Prior to mounting, make sure to securely connect the power supply block and 2 RCA audio cables. Once connected, secure the subwoofer box to the cabinet and/or floor with deck screws and a suitable bracket - like a simple L bracket.

  7. Secure the access panel to help prevent subwoofer vibrations
  8. Prior to upgrading the subwoofer, I noticed a lot of harsh vibration and noise caused by the unsecured access panel cover under the dinette cushion. To help mitigate future subwoofer vibration problems, I added thin weather stripping under the cover and used screws to secure the cover to the aluminum edging.

  9. Add Subwoofer port to improve subwoofer performance
  10. The factory Airstream subwoofer is mounted in the enclosed storage compartment under the kitchen dinette seating without any porting to the cabin of the trailer. To improve the subwoofers performance, I added a port to the subwoofer cabinet and used the old speaker mount and grill to finish the port.

    To use the old speaker mounts, first measure and cut out the proper sized hole in the cabinet wall. I used a cordless jigsaw for this. Then secure the speaker mount and finish with the speaker grill to provide an professional looking port for the subwoofer.

amzn_assoc_placement = "adunit0"; amzn_assoc_tracking_id = "yawesome-20"; amzn_assoc_ad_mode = "manual"; amzn_assoc_ad_type = "smart"; amzn_assoc_marketplace = "amazon"; amzn_assoc_region = "US"; amzn_assoc_linkid = "38cbd5d6f5098c8871f40f432849c697"; amzn_assoc_design = "in_content"; amzn_assoc_asins = "B01M3Y0OOX,B00V6DXVZQ";

Leave a Reply

Your email address will not be published. Required fields are marked *

    Weboost RV cellular signal booster for RV camping to improve phone, text and internet service.

    Weboost RV Cellular Booster

    Perfect cheese fondue every time with high quality cheese and wine mixed in the perfect ratio.

    Perfect Cheese Fondue Recipe